If you have been issued with an HP EliteBook device, then this session is for you. If not, then please move on to the next session.
In this session, you’ll start to become familiar with your new HP EliteBook device, or what we commonly refer to as your “power laptop”.
At the top of the screen is the camera used to take your image or record a video. When the camera is in use, you’ll see a little light come on to the side of the camera. To either side of the camera are microphones, used to capture your voice, unless you are using a headset at the time.
In the top left corner of the keyboard is the power button, used to switch the device on. When switched on, the power light above the button will light up.To the left of the keyboard, along the edge of the device you’ll find a couple of sockets and buttons.
The slot at the rear is a security cable slot which can be used to attach the device to a desk or another heavy object.
Next is a vent. Be sure never to block this or any other vent.
The rectangular USB port is used to connect items such as encrypted memory sticks to your device. You could also connect your smart phone to the device and your device would charge your smartphone, via the socket.
The final large slot is a smart card reader, which is not in use within NFU Mutual.
To the right side of the keyboard, along the edge of the device, you’ll find a number of sockets.
Working from the back to the front of the device, the first is the power socket. Simply connect the barrel shaped power adapter to this socket to charge the device.
Beside the power socket is a battery light. It’ll shine white when the battery charge exceeds 90%. It’ll shine amber when the charge is 90% or less. It’ll be off when the battery is not charging, and it will flash orange when the battery is low and needs charging if data loss is to be avoided.
Next is a USB Type-C socket, for connecting the device to your desktop screens, network and power. While away from the office, you can use the port to connect to and charge a compatible mobile device, like a Smartphone.
Next are the docking connector slot and network connector, which we don’t use at NFU Mutual.
Then there is an HDMI socket to allow the device to be connected to video and/or audio equipment, such as a high definition television or projector.
Next is a USB port, like the one on the left side of the device.
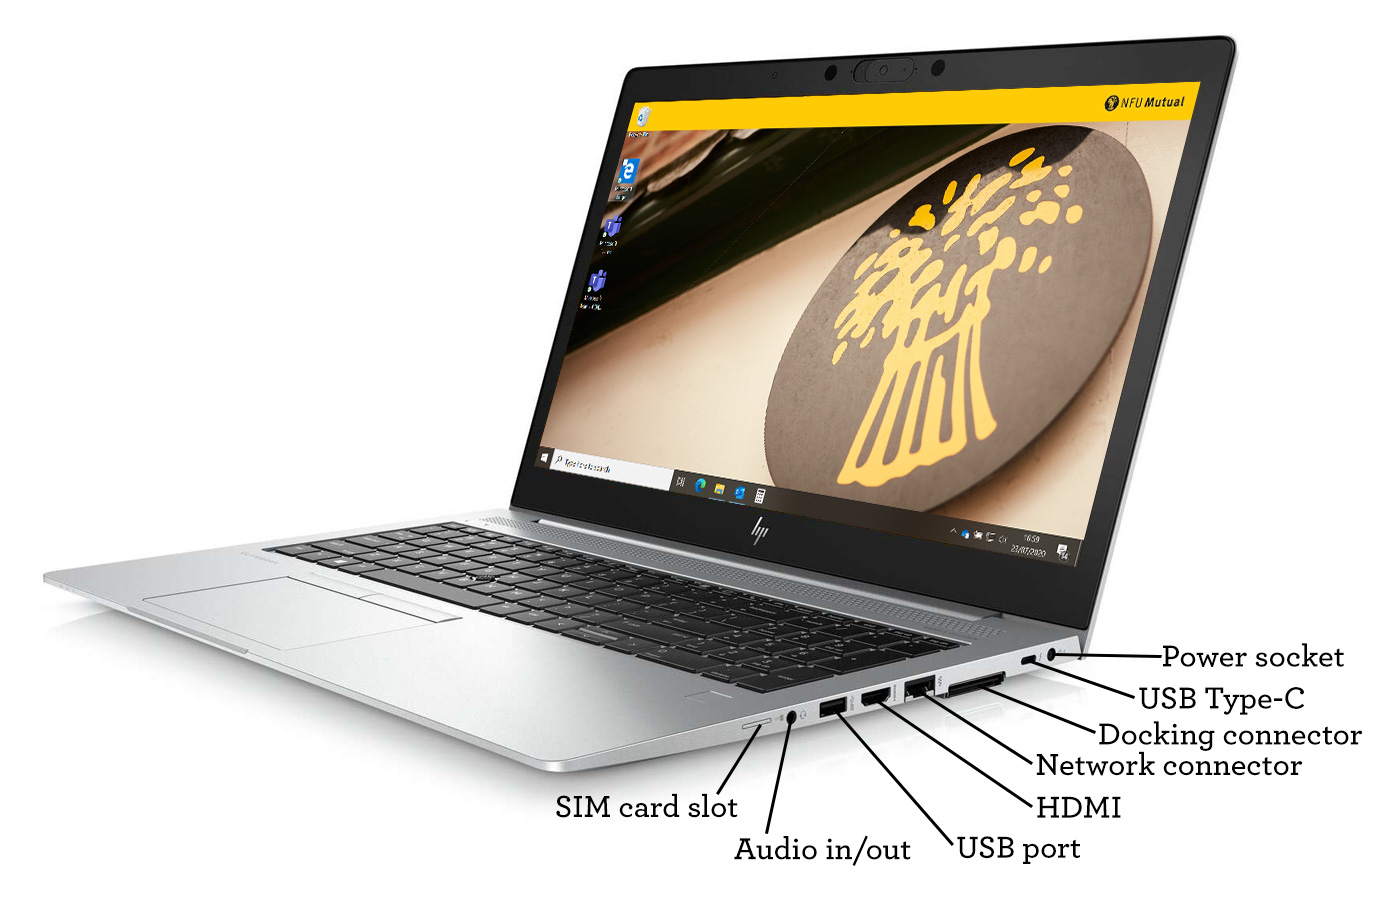
Next there is a 3.5mm audio-in/out combination socket, which could be used with compatible headphones etc.
And finally, towards the front of the device, is a SIM card slot.
The TouchPad helps you navigate your device’s screen and control the pointer using simple touch gestures. You can also use the left and right TouchPad buttons in the upper left and right corners of the TouchPad as you would use the corresponding buttons on an external mouse.
The TouchPad responds to multi-finger gestures. So, as well as tapping the TouchPad to simulate a left click, you can tap it with two fingers and that’s like a right-click.
Move those same two fingers up or down the TouchPad and the screen will scroll with your fingers.
In some applications, you can place your thumb and forefinger on the TouchPad and then bring them together to zoom in; or move them apart to zoom out.
There are more gestures available than these, but that should be enough to get you started.
Be careful when closing the lid of your laptop down on to the keyboard to ensure that nothing is in the way, like a pen, as this will likely cause damage to the screen and keyboard.
Your device is equipped with a front-facing camera in the space immediately above the centre of the screen. This is perfect for video calls and recording video blogs (vlogs).
Before you take any photos or record any videos, consider your surroundings. You need to be certain than no sensitive information is within the shot, especially if you don’t know who will be viewing the images or videos that you capture.
Make sure your face is well lit, ideally with a light source behind the camera, shining on your face.
When you come to use your device in the office, you can connect it to your screens and the network all through the one USB-C cable. Simply connect the cable to one of the USB-C sockets on the right of your device. Not only will this connect the device to the screens and network, it will also keep the device charged.